Placemat is our open-source software built to provide data center virtualization for CI automated testing along with technologies like QEMU/KVM virtual machines and Linux networking stacks. Setting up a CI environment for tools to build infrastructure automatically, such as Kubernetes installers, can be difficult because multiple hosts and network settings equivalent to an entire data center network are needed. That's where Placemat comes in. It can simulate various data centers based on a configuration and provide powerful support for your automated testing. We're running our test suites such as server provisioning, Kubernetes cluster setup, and Kubernetes native applications on a virtual data center built with Placemat. This article introduces its features, usage, and future CI improvement with Placemat on Kubernetes.
Features
- Single Binary
- Flexible YAML configuration
- Various VM Options
- Virtual BMC
Single Binary
Placemat is distributed as a single binary file. It's simple. Once you run the installed binary with your YAML configuration file, then it configures networks and starts up virtual machines based on your configuration and cleans up everything it has created when it ends. This simplicity makes life easier for administrators to set up a CI environment where automatic test suites run. Install Placemat with a distributed release Debian package after installing dependencies with the apt command, and then you're ready to go.
Flexible YAML Configuration
Placemat provides the following resources to define virtual data centers flexibly.
Network: a virtual L2 network switchNetworkNamespace: a Linux network namespace (virtually L3 router)Node: a KVM virtual machineImage: a QEMU disk image
kind: Network
name: my-net
type: external
use-nat: true
address: 10.0.0.0/22
---
kind: NetworkNamespace
name: my-netns
init-scripts:
  - /path/to/script
interfaces:
  - network: net0
    addresses:
      - 10.0.0.1/24
apps:
  - name: bird
    command:
    - /usr/local/bird/sbin/bird
    - -f
    - -c
    - /etc/bird/bird_core.conf
---
kind: Node
name: my-node
interfaces:
  - net0
volumes:
  - kind: image
    name: root
    image: image-name
    copy-on-write: true
  - kind: localds
    name: seed
    user-data: user-data.yml
    network-config: network.yml
  - kind: raw
    name: data
    size: 10G
  - kind: hostPath
    name: host-data
    path: /var/lib/foo
    writable: false
ignition: my-node.ign
cpu: 2
memory: 4G
smbios:
  manufacturer: cybozu
  product: mk2
  serial: 1234abcd
uefi: false
tpm: true
---
kind: Image
name: ubuntu-cloud-image
url: https://cloud-images.ubuntu.com/releases/20.04/release/ubuntu-20.04-server-cloudimg-amd64.img
Our Virtual Data Center Architecture
Here is our virtual data center where our test suites run.
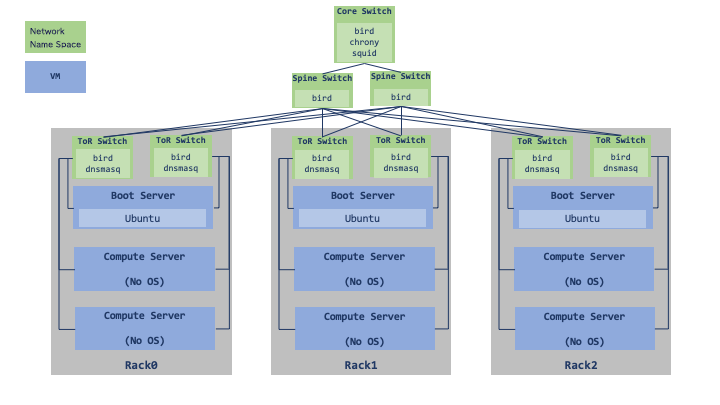
- Create Network Namespaces and Bridges, and configure the data center network by connecting them with veth.
- Start-up virtual machines of boot servers, compute servers, connect those to bridges with tap interface, and then connect them to each rack's ToR switch.
This article shows you more about our data center network design.
Various VM Options
Node resource offers a wide variety of VM configurations to apply for different use cases.
- Provisioning
- In addition to PXE / UEFI HTTP network booting, you can automate your server's provisioning using cloud-init or ignition, making your task set up a test environment easier.
- File Sharing
- With
hostPathvolume, you can share files between a host and a guest using virtio-9p-device. Configure cloud-init or ignition to mount the volume, and then you can share some files for your test suites.
- With
- TPM
- You can set up Trusted Platform Module and test a use case such as storing disk encryption keys.
- UEFI
- You can use UEFI as well as the traditional BIOS.
Virtual BMC
The virtual BMC offers remote management of VMs inside a cluster Placemat manages. You can manipulate VM's power status via IPMI v2.0 or Redfish. This feature is intended for use in test scenarios to verify the system behavior when rebooting servers. I'll show you how to use it later so that you can give it a try.
Quick Start
This section will show you how to run Placemat using the example here. Placemat supports Ubuntu 18.04+, and you need to enable Nested Virtualization if you want to run it on a VM.
We are going to build a cluster with one boot server and two netboot client servers, hereinafter, referred to as worker, as follows.
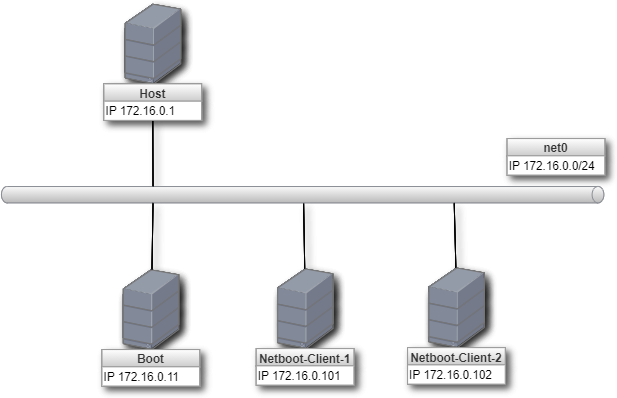
- Start up a boot server with Ubuntu 20.04 disk image, initialize using cloud-init and run dnsmasq and Nginx server. It works as a network boot server.
- Netboot client servers retrieve iPXE from the boot server and boot up using Flatcar Container Linux image distributed from the boot server.
Here is the configuration file.
kind: Network
name: net0
type: external
use-nat: true
address: 172.16.0.1/24
---
kind: Network
name: bmc
type: bmc
use-nat: false
address: 172.16.1.1/24
---
kind: Image
name: ubuntu-image
url: https://cloud-images.ubuntu.com/releases/20.04/release/ubuntu-20.04-server-cloudimg-amd64.img
---
kind: Node
name: boot
interfaces:
  - net0
volumes:
  - kind: image
    name: root
    image: ubuntu-image
  - kind: localds
    name: seed
    user-data: user-data.example.yml
    network-config: network-config.example.yml
cpu: 1
memory: 2G
---
kind: Node
name: worker-1
interfaces:
  - net0
volumes:
  - kind: raw
    name: data
    size: 10G
cpu: 1
memory: 2G
smbios:
  serial: 1234abcd
uefi: false
---
kind: Node
name: worker-2
interfaces:
  - net0
volumes:
  - kind: raw
    name: data
    size: 10G
cpu: 1
memory: 2G
smbios:
  serial: 5678efgh
uefi: false
Install
You can install dependencies and Placemat like:
# Install dependencies
$ sudo apt-get update
$ sudo apt-get -y install --no-install-recommends qemu qemu-kvm socat picocom cloud-utils freeipmi-tools

# Install Placemat
$ curl -O -sfL https://github.com/cybozu-go/placemat/releases/download/v2.0.5/placemat2_2.0.5_amd64.deb
$ sudo dpkg -i ./placemat2_2.0.5_amd64.deb
Run Placemat
Clone Placemat repository and setup the example cluster like:
$ git clone https://github.com/cybozu-go/placemat.git
$ cd placemat/examples
$ sudo placemat2 --data-dir ./data --cache-dir ./cache ./cluster.example.yml
If you can see the log below, then everything is going well so far.
placemat2 info: "Start Placemat API server" address="127.0.0.1:10808"
Login to the Servers
Open another console, and show a VM list like:
$ pmctl2 node list
boot
worker-1
worker-2
Login to the boot server.
$ sudo pmctl2 node enter boot

# Login with User: ubuntu, Password: ubuntu
# Press Ctrl-q and Ctrl-x when you exits the terminal
Login to worker-1. You can do it after downloading the OS image from the boot server and finishing its setup. It may take some time.
# Login to Worker-1
$ sudo pmctl2 node enter worker-1

# Press Ctrl-q and Ctrl-x when you exits the terminal
Start BMC Server
Next, we will start up the worker-1 BMC server and reboot it via IPMI and Redfish.
$ sudo pmctl2 node enter worker-1
$ echo 172.16.1.2 | sudo dd of=/dev/virtio-ports/placemat

# Press Ctrl-q and Ctrl-x when you exits the terminal
Placemat attaches a special character device at /dev/virtio-ports/placemat to Node VMs, and wait for the BMC address to be notified. It starts up a BMC server when the address is arrived, emitting the log messages like:
placemat2 info: "creating BMC port" bmc_address="172.16.1.2" serial="1234abcd"
placemat2 info: "BMC USer: Add user" user="cybozu"
Retrieve worker-1 power status with ipmipower like:
$ ipmipower --stat -u cybozu -p cybozu -h 172.16.1.2 -D LAN_2_0
172.16.1.2: on
With Redfish like:
$ curl -sku cybozu:cybozu https://172.16.1.2/redfish/v1/Systems/System.Embedded.1 | jq .PowerState
"On"
Reboot Worker-1
Reboot worker-1 with ipmipower like:
$ curl -sku cybozu:cybozu https://172.16.1.2/redfish/v1/Systems/System.Embedded.1 | jq .PowerState
"On"
You can see worker-1 is rebooting with network boot on its console like:
$ sudo pmctl2 node enter worker-1
# Press Ctrl-q and Ctrl-x when you exits the terminal
For Redfish like:
$ curl -X POST -H "Content-Type: application/json" -d '{"ResetType":"ForceRestart"}' -sku cybozu:cybozu https://172.16.1.2/redfish/v1/Systems/System.Embedded.1/Actions/ComputerSystem.Reset
Stop Placemat
Press Ctrl-c on the console where you started Placemat. It cleans up the bridges, network namespaces, etc., and then exits.
Placemat on Kubernetes
Applications that consume huge computer resources running on a Kubernetes cluster, such as Rook/Ceph and MySQL Operator MOCO, have deteriorated CI stability and made it slow lately.
- Instability of nested VMs on GCP.
- GCP's quota limit.
- Costly GCP fees.
- Long CI execution time due to CPU and IO bottlenecks of Nested VMs.
To solve these issues, we are planning to run Placemat on our on-premise Kubernetes clusters.
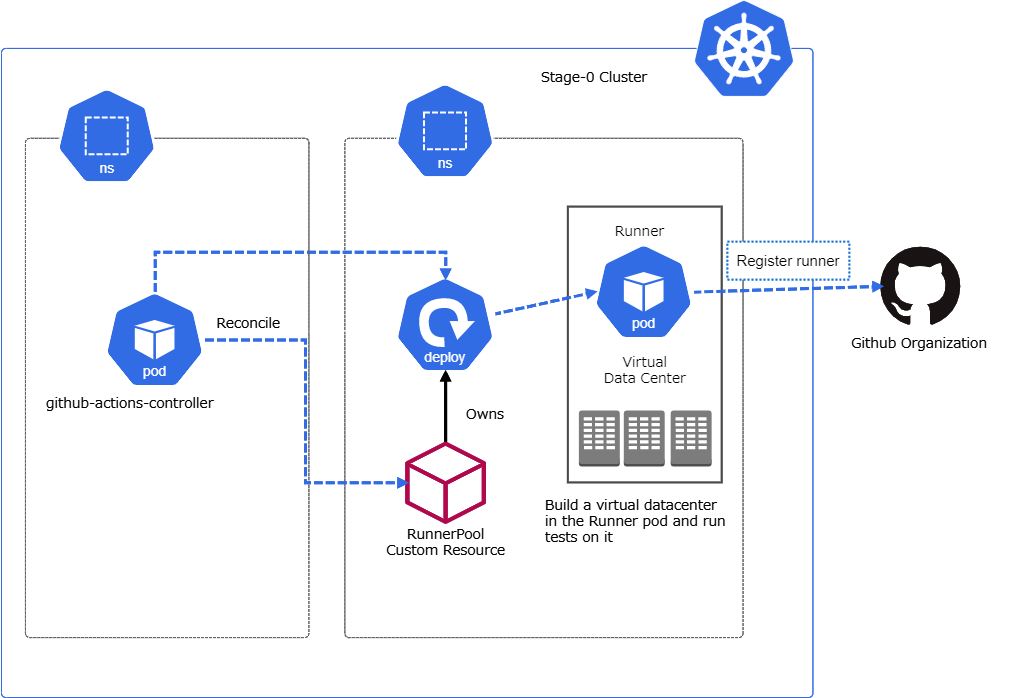
- Build a virtual data center inside a pod of our staging Kubernetes built on top of our bare-metal servers.
- Run the workflow on the virtual data center with the self-hosted runner of Github Actions.
We're working on developing an operator named github-actions-controller that manages self-hosted runners on a Kubernetes cluster. Once we add the finishing touches to the operator, we will migrate the CI environment to run workflows in a virtual data center built on top of a Kubernetes pod. The preliminary PoC has indicated that there will be a significant performance improvement. It is very promising.